PHP開発・デバッグ環境の構築
カテゴリ:PHP編
サーバーサイドプログラミング言語として、LAMPのPとして知られる代表的なWeb開発言語であるPHPの開発環境の構築について解説していきます。エディタの準備
PHPのエディタに関しては多数ありますが、代表的なフリーのエディタは以下になるでしょう。
- Visual Studio Code
- Atom
- Sublime Text
- NetBeans
- Eclipse
本記事では、開発・テスト環境の構築(VSCode+bash+Node.js+Apache)で解説したVisual Studio Codeによる開発環境をベースとしてPHPの開発環境を構築していきます。 まだ、Visual Studio Codeの開発環境を準備していない場合は、上記記事に従い準備してください。
PHP実行環境の構築
開発環境にPHPがインストールされていない場合は、以下の手順でインストールします。
PHPのインストール
Windows 10 + Windows Subsystem for Linux環境
以下のコマンドでPHPをインストールします。
$ sudo apt install php
Mac環境
Macの場合はPHPはデフォルトでOSにインストールされているためインストール作業は不要です。
PHPのバージョン確認
以下のコマンドでPHPのバージョンを確認できます。
$ php -v
例)
$ php -v
PHP 7.2.24-0ubuntu0.18.04.4 (cli) (built: Apr  8 2020 15:45:57) ( NTS )
Copyright (c) 1997-2018 The PHP Group
Zend Engine v3.2.0, Copyright (c) 1998-2018 Zend Technologies
    with Zend OPcache v7.2.24-0ubuntu0.18.04.4, Copyright (c) 1999-2018, by Zend Technologies
Composerの導入
PHPのパッケージ管理ツールであるComposerも今後利用していくことになるかと思いますのでインストールしておきます。
Composerのインストール
Windows 10 + Windows Subsystem for Linux環境
以下のコマンドでComposerをインストールします。
$ curl https://getcomposer.org/installer | php
Mac環境
Composerの公式サイトからCommand-line installationに記載されているコマンドをMacのターミナルに貼り付けて実行します。例)
php -r "copy('https://getcomposer.org/installer', 'composer-setup.php');"
php -r "if (hash_file('sha384', 'composer-setup.php') === 'e0012edf3e80b6978849f5eff0d4b4e4c79ff1609dd1e613307e16318854d24ae64f26d17af3ef0bf7cfb710ca74755a') { echo 'Installer verified'; } else { echo 'Installer corrupt'; unlink('composer-setup.php'); } echo PHP_EOL;"
php composer-setup.php
php -r "unlink('composer-setup.php');"
composerコマンドへのパスを通す
以下のコマンドで、composer.pharファイルを/usr/local/bin/composerに移動してパスを通します。
$ sudo mv composer.phar /usr/local/bin/composer
Composerのバージョン確認
以下のコマンドでComposerのバージョンを確認できます。
$ composer -v
例)
$ composer -v
   ______
  / ____/___  ____ ___  ____  ____  ________  _____
 / /   / __ \/ __ `__ \/ __ \/ __ \/ ___/ _ \/ ___/
/ /___/ /_/ / / / / / / /_/ / /_/ (__  )  __/ /
\____/\____/_/ /_/ /_/ .___/\____/____/\___/_/
                    /_/
Composer version 1.10.6 2020-05-06 10:28:10
...
Visual Studio Codeの設定
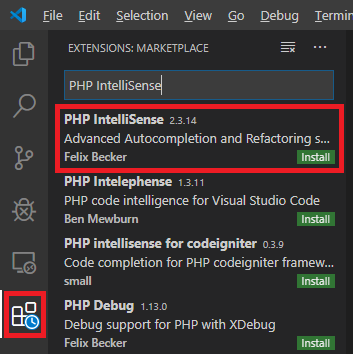
Visual Studio CodeにPHP入力支援の拡張機能であるPHP IntelliSenseをインストールします。
デバッグ環境の準備
PHPの代表的なデバッグツールとしてXdebugがありますのでこれをインストールします。 Xdebugの公式ページの手順に従い、Xdebugをインストールします。
Windows 10 + Windows Subsystem for Linux環境もMac環境も以下のコマンドでのインストールになります。
$ sudo pecl install xdebug
例)
$ sudo pecl install xdebug
...
running: make INSTALL_ROOT="/tmp/pear/temp/pear-build-rootX0Ojqr/install-xdebug-2.9.5" install
Installing shared extensions:     /tmp/pear/temp/pear-build-rootX0Ojqr/install-xdebug-2.9.5/usr/lib/php/20170718/

  +----------------------------------------------------------------------+
  |                                                                      |
  |   INSTALLATION INSTRUCTIONS                                          |
  |   =========================                                          |
  |                                                                      |
  |   See https://xdebug.org/install.php#configure-php for instructions  |
  |   on how to enable Xdebug for PHP.                                   |
  |                                                                      |
  |   Documentation is available online as well:                         |
  |   - A list of all settings:  https://xdebug.org/docs-settings.php    |
  |   - A list of all functions: https://xdebug.org/docs-functions.php   |
  |   - Profiling instructions:  https://xdebug.org/docs-profiling2.php  |
  |   - Remote debugging:        https://xdebug.org/docs-debugger.php    |
  |                                                                      |
  |                                                                      |
  |   NOTE: Please disregard the message                                 |
  |       You should add "extension=xdebug.so" to php.ini                |
  |   that is emitted by the PECL installer. This does not work for      |
  |   Xdebug.                                                            |
  |                                                                      |
  +----------------------------------------------------------------------+


running: find "/tmp/pear/temp/pear-build-rootX0Ojqr/install-xdebug-2.9.5" | xargs ls -dils
2251799814299951    0 drwxr-xr-x 1 root root    4096 May 23 20:46 /tmp/pear/temp/pear-build-rootX0Ojqr/install-xdebug-2.9.5
1688849860878739    0 drwxr-xr-x 1 root root    4096 May 23 20:46 /tmp/pear/temp/pear-build-rootX0Ojqr/install-xdebug-2.9.5/usr
1688849860878740    0 drwxr-xr-x 1 root root    4096 May 23 20:46 /tmp/pear/temp/pear-build-rootX0Ojqr/install-xdebug-2.9.5/usr/lib
1688849860878741    0 drwxr-xr-x 1 root root    4096 May 23 20:46 /tmp/pear/temp/pear-build-rootX0Ojqr/install-xdebug-2.9.5/usr/lib/php
1688849860878742    0 drwxr-xr-x 1 root root    4096 May 23 20:46 /tmp/pear/temp/pear-build-rootX0Ojqr/install-xdebug-2.9.5/usr/lib/php/20170718
2251799814300049 1920 -rwxr-xr-x 1 root root 1899400 May 23 20:46 /tmp/pear/temp/pear-build-rootX0Ojqr/install-xdebug-2.9.5/usr/lib/php/20170718/xdebug.so

Build process completed successfully
Installing '/usr/lib/php/20170718/xdebug.so'
install ok: channel://pecl.php.net/xdebug-2.9.5
configuration option "php_ini" is not set to php.ini location
You should add "zend_extension=/usr/lib/php/20170718/xdebug.so" to php.ini
最後に、php.iniファイルの最後に以下を追加します。
zend_extension=/usr/lib/php/20170718/xdebug.so
xdebug.remote_enable=on
例)
sudo vi /etc/php/7.2/cli/php.ini
...
; Local Variables:
; tab-width: 4
; End:

zend_extension=/usr/lib/php/20170718/xdebug.so
xdebug.remote_enable=on
php -v コマンドで以下のようにXdebug バージョンが表示されればOKです。
$ php -v
PHP 7.2.24-0ubuntu0.18.04.4 (cli) (built: Apr  8 2020 15:45:57) ( NTS )
Copyright (c) 1997-2018 The PHP Group
Zend Engine v3.2.0, Copyright (c) 1998-2018 Zend Technologies
    with Xdebug v2.9.5, Copyright (c) 2002-2020, by Derick Rethans
    with Zend OPcache v7.2.24-0ubuntu0.18.04.4, Copyright (c) 1999-2018, by Zend Technologies
以上でPHP開発・デバッグ環境の構築は完了です。
公開日時:2020年05月23日 20:56:51